My Shrimpy Tankfolks

We have a small 1 footer aquarium at home (that’s pretty much what we have space for). In it, there are just shrimps…yes fancy looking ones (cherry shrimps and crystal red bee shrimps) and they don’t grow bigger than 2 cm. Kiddo likes checking on them and attending their feeding time daily. It’s autumn and the water temperature’s just right for the crystal red bee shrimplets to hatch.

Note that this DIY Toy activity can be divided into 2 or 3 sessions due to time needed for paint to dry.
Session 1: Painting/Mark-making
What you need for this session are:
- newsprint/ drawing paper
- paint + paint brushes
Instructions:
- Get kiddo to observe the colours and textures in the tank.
- Kiddo then paints or creates shapes, colours, textures that she had observed.
- Guide kiddo when attempting to render certain shapes/strokes.
- Set aside to dry (yes, patience is a virtue to be learnt).

Session 2: Shrimp-making
Ok let’s try upsizing these fellas……What you need are (for each shrimp):
- 1 toilet roll (for the head & body) + 1/4 toilet roll (for legs)
- 1 pipe cleaner for feelers
- scissors
- stapler/sticky tape/ glue
- markers
Instructions:
- Measure an adequate amount of paper for each shrimp and draw out the following shape from the painted newsprint/drawing paper as its ‘shell’
- Get kiddo to cut out the shells for use later

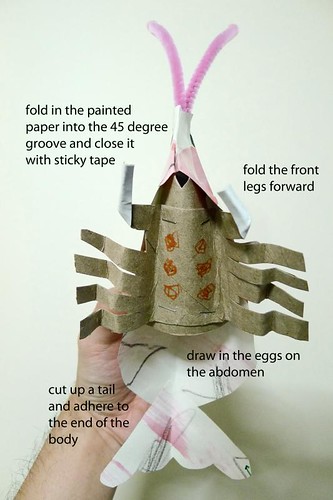
- Make a 45 degree cut on the ‘head’ end of the toilet roll.
- Cut up 1/4 of the toilet roll into 5 pairs of legs and attach (staple) to the ‘abdomen’ area of the body. Fold the legs into segments.
- Staple and fasten a pipe cleaner on the head’s end.

- Adhere the ‘shell’ onto the body. Fold part of the ‘shell’ into the 45 degree groove and join up this area with sticky tape.
- Draw and get kiddo to cut up a fan shape ‘shell’ to be attached as the tail.
- Get kiddo to draw in the eggs onto its abdomen so that it becomes a berried mama shrimp.
- Get kiddo to apply glue/ use sticky tape to adhere shell to the body roll. Remind kiddo where is the head and tail of the shrimp.
- Make a small triangular cut at its forehead and kiddo can then draw in its beady black eyes with a black marker.

Session 3: Plant+moss-making
Plants are an important part of aquaria, so here goes……What you need are:
- 1/2 toilet roll for each plant/ cluster of moss
- staple/ sticky tape/ glue
- green/blue/yellow markers
Instructions:
- Get kiddo to draw the outlines/shapes of leaves (long pointy ones) and moss (stringy noodles) on the green marks that she’d seen in the aquarium. Then get her to cut it out.
- While she’s at it, attach 4 short pieces of pipe cleaners onto 1/2 of toilet roll.

- Then attach the individual leaf to each pipe cleaner portion.
- Kiddo then helps to adhere the bottom end of each leaf onto the toilet roll. This will allow the leaves to stay in place yet they can be bent/shaped for your ‘aquarium-scape’
- Randomly adhere ends of the stringy paper noodles that kiddo has cut out (she needed help with cutting curves cos her scissors handling skills not too good yet) onto another 1/2 toilet roll until it forms into a cluster.
- Kiddo can then draw in whatever details she observes on the leaves/moss with her markers.
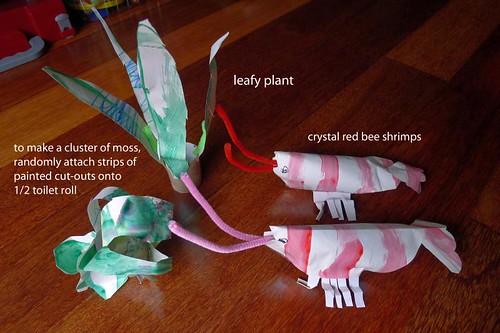
So that’s it….throw a rug/ blanket as the ‘substrate’ and watch kiddo makes these upsized critters come alive. Mmmmm just remind her that these fellas should not be joining their real counterparts in the tank…ever.