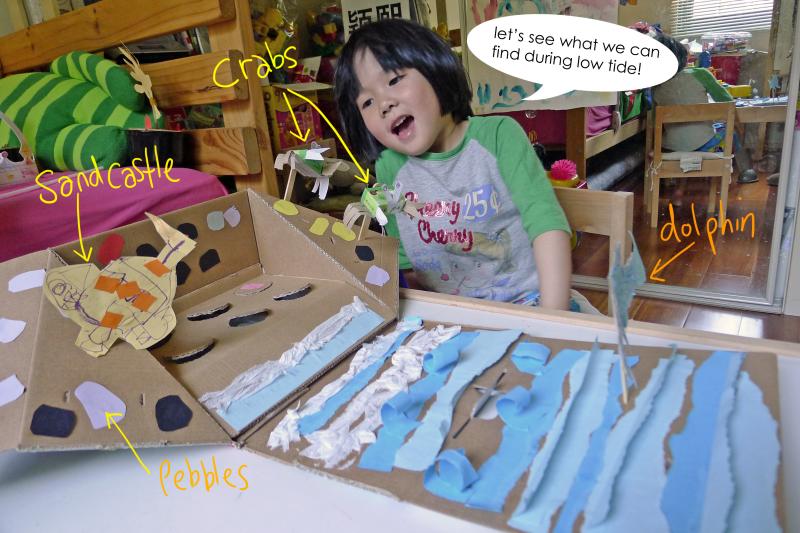
Beach-in-a-box

Spring’s here and it’s time to head to the beach. Kiddo likes making sandcastles and picking up seashells but unfortunately we don’t live on some beachfront property, so this will have to do on days we can’t venture out.
This is also a space-saving DIY toy. So when u need it, just open the box and taadaaa a self-contained mini beach with a bit of surf and stick’em-in-critters.
Note: This project does take a while to make so better to space out across a couple of sessions.
What you need are:
- a decent mid-sized cardboard box, preferably with double cover flaps
- cardboard pieces
- toilet rolls
- colour paper
- tissue paper
- colouring pens
- PVA glue
- sticky tape
- scissors
- craft knife
Instructions:
Session 1
- Get kiddo excited by reminding her of what she likes about visiting the beach. This is also an opportunity to do a mini lesson on the ecosystem of the waterfront, what creatures she can find especially when the tide recedes. So she gets prepped to create a beach with ‘holes’ to drop/pick up critters that live in this habitat.
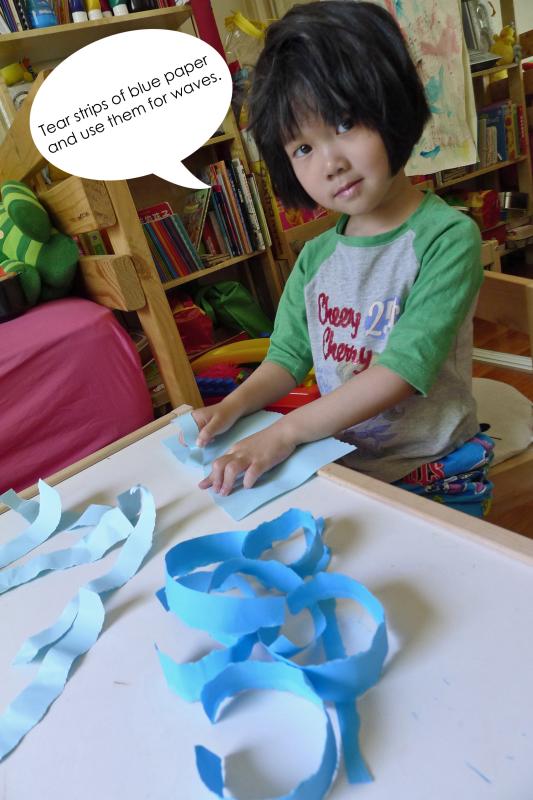
- Get kiddo to tear strips of paper for the water. No need to fuss about getting straight strips. Uneven length and edges are good. Good too if you have 2 different shades of blue for the ‘sea’.
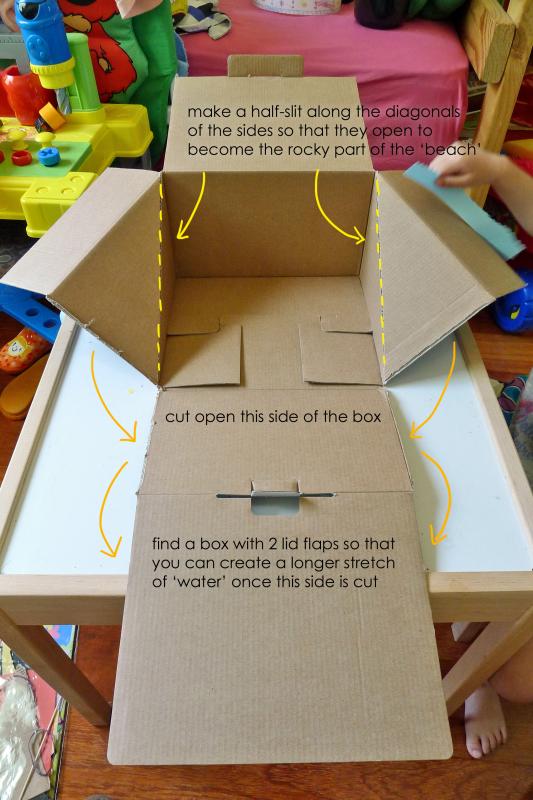
- While she is busy with tearing up the strips, the box is being cut up. Make sure 1 side of the box folds out nicely as the ‘sea’.
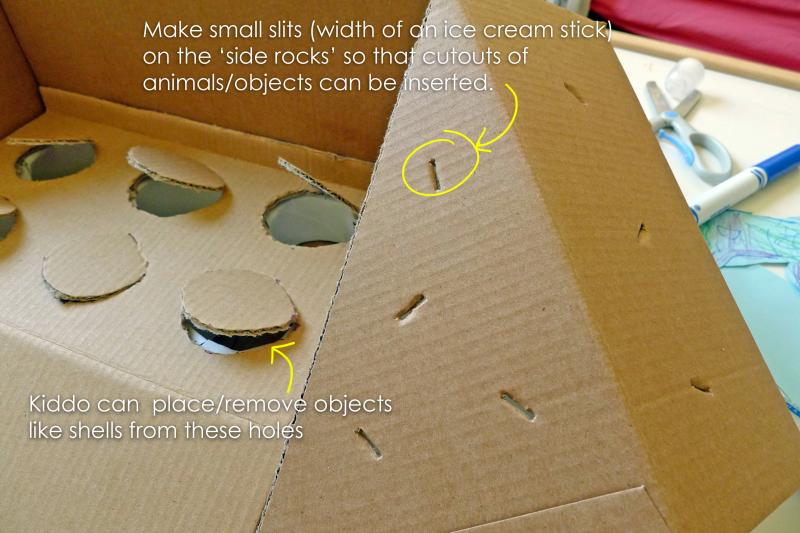
- Make half-slits along the diagonals of the sides and fold out. These will become the ‘rocky part of the beach’.
- Make sure that the box can still be folded back into its original form.
- Once she’s done, she gets to stick on the paper strips. Instruct her to alternate the different shades.
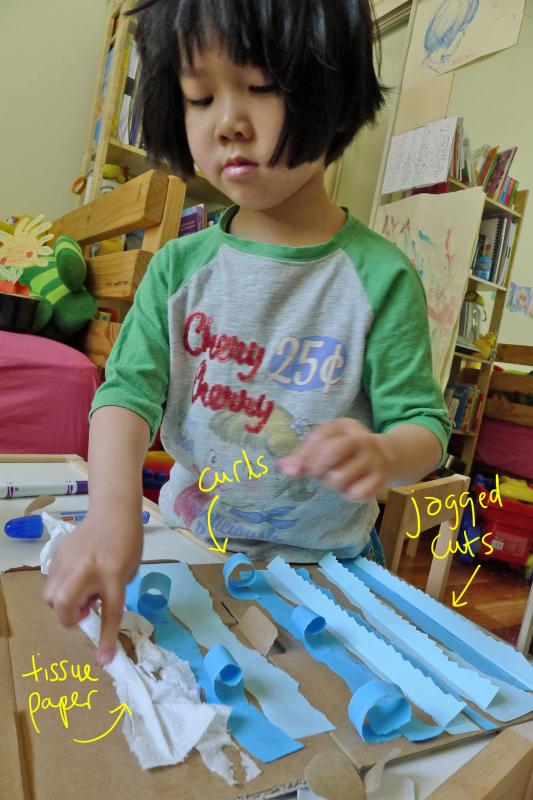
- Help kiddo cut up some jagged strips, fold and stick them in between the coloured strips.
- Help kiddo curl some ‘waves’ too.
- Now comes the slightly messy bit…..apply glue to the area nearest to the ‘beach’ and stick on strips of tissue/toilet paper to create the ‘foamy’ look when the water hits the beach.
- While she’s busy sticking / unsticking herself, get down to the more technical bit of making mini ‘potholes on the beach’.
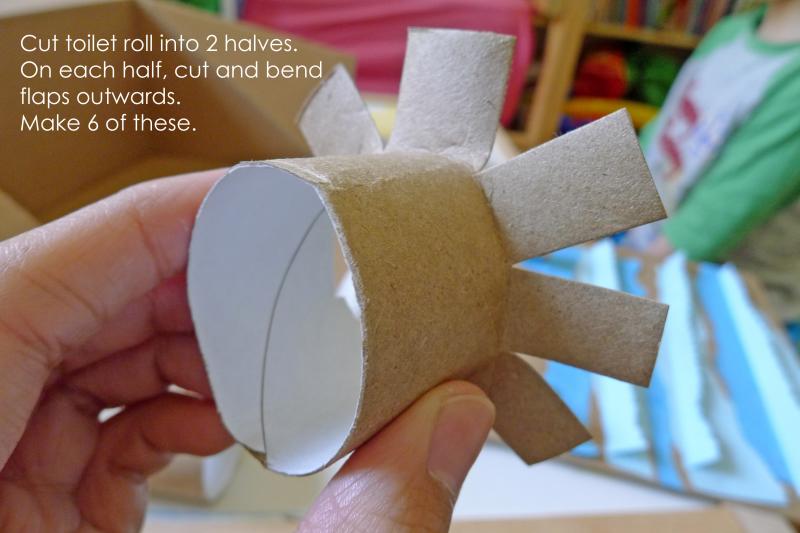
- Cut toilet rolls into halves and make them into ‘daisy’-shaped structures. These will serve as ‘potholes’ for critters.
- Depending on the size of the box that you have, cut up another piece of cardboard with flaps on its sides. This will be the ‘surface of the beach’.
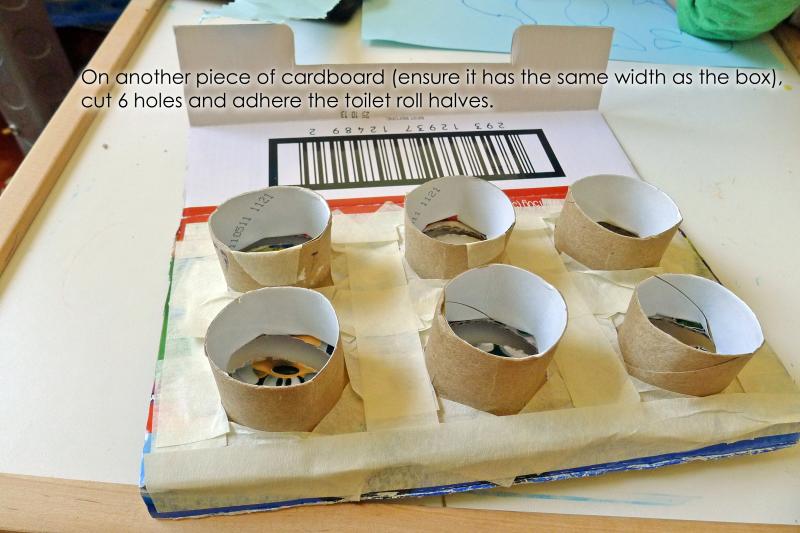
- Cut out holes on this ‘surface’ piece of cardboard and attach the ‘daisy’-shaped structures on the under side of the ‘surface’ cardboard.
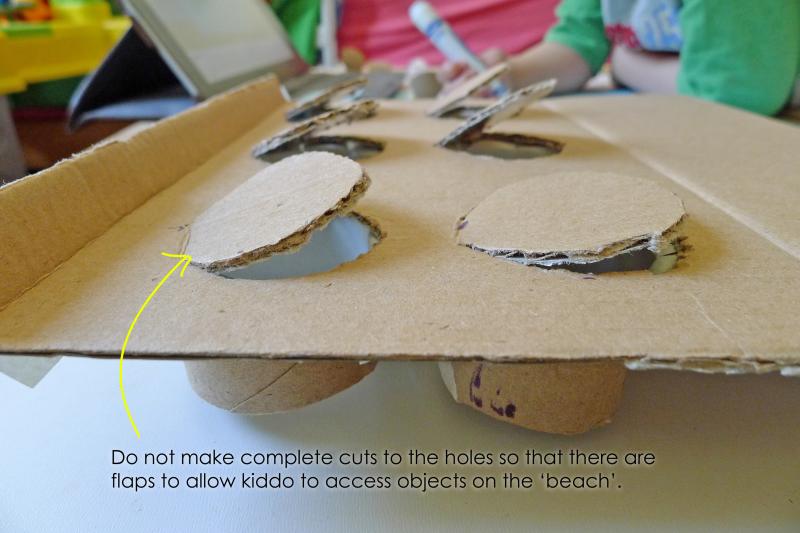
- Make sure that the holes are not completely cut and retain a flap on each hole when it’s on the right side.
- Kiddo may get her job done faster than you’d have imagined. In that case get her to draw out any sea creature she can remember on the beach / what she’d like to see in the ‘sea’. & that will leave you some time and space to fit the ‘beach’ into the box.
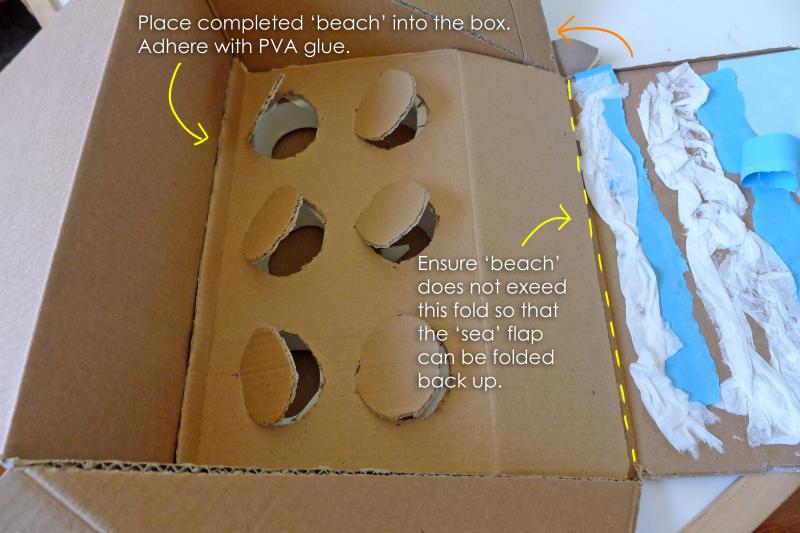
- Create a lil slope for the front of the ‘beach’ so that it conceals the ‘daisy’-shaped structures underneath.
- Use PVA glue to securely adhere this ‘beach’ to the box.
- So here’s the end of session 1. Tell kiddo it’s time for a break since the glue’s gonna take some time to dry. Go through her drawings and assure her that they will be the next thing to be worked on after the break.
Session 2
- This session centres on making creatures/objects that populate this habitat. It’s really up to individual experiences but clams, crabs, seabirds, seaweed, sandcastle etc etc are a good bet.
- Kiddo may need some time to ‘touch up’ on her drawings / work on colouring them. So in the meantime, make small slits around the ‘rocky sides’ and ‘sea’.
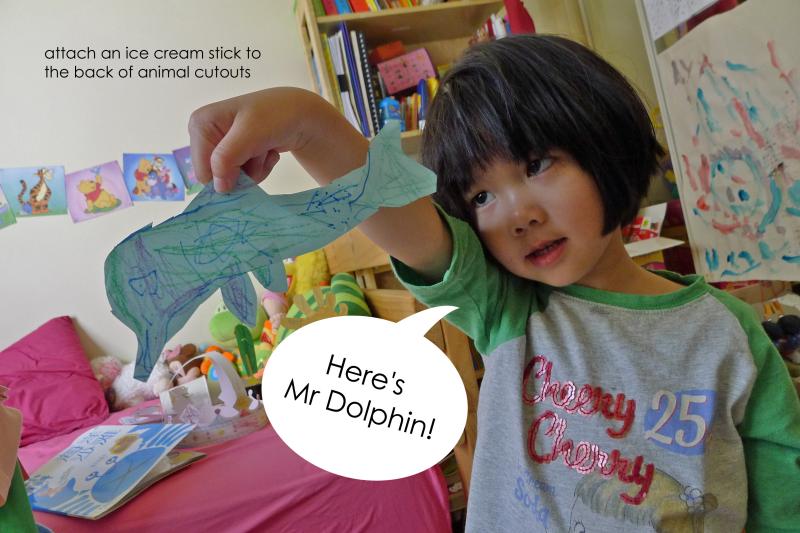
- Get kiddo to cut out her creatures and stick an ice cream stick behind each of them.
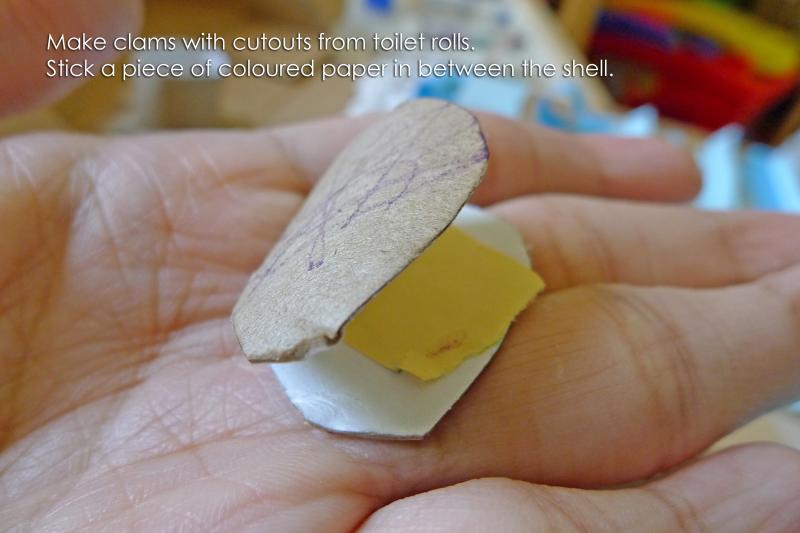
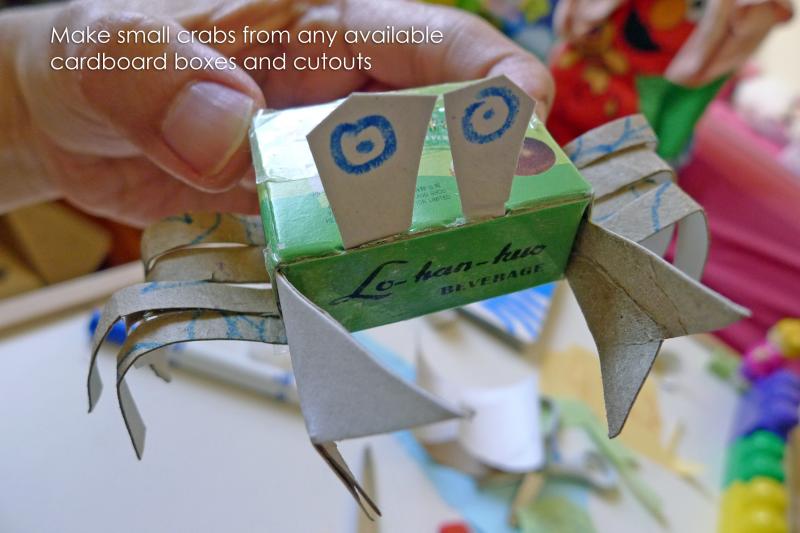
- Now it’s also time to make smaller critters that fit the ‘potholes on the beach’….e.g. clams and crabs. The crabs can also go on sticks too.
- Now the finishing touches……kiddo helps to cut out pieces of colour paper as pebbles/stones and sticks them around the beach.
- Last but not least, show kiddo that this toy lives up to it’s name ‘beach-in-a-box’ by packing in the critters and folding the beach back into the original form of the box.
- Explain to kiddo that it’s now her responsibility to take care of her piece of ‘real estate’ and its inhabitants, hence they must be packed away nicely after play.
- A nice touch will be to make a shoulder strap on the sides of the box so that kiddo can it carry around to play. 🙂